Constructing shelters with natural resources is a skill that can be incredibly useful in survival situations or when trying to bond with nature. Let’s explore the techniques and materials needed to create a shelter from the environment around us.
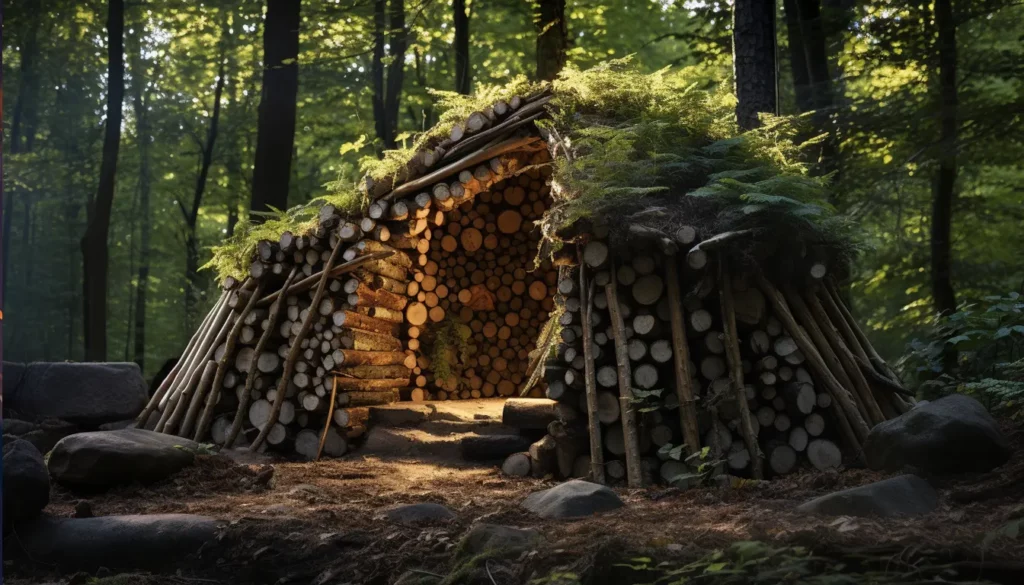
Nature offers us lots of resources that can be used to make a strong and practical shelter. We can use branches, leaves, rocks, and mud to build a shelter that meets our needs and protects us.
When we construct a shelter with natural resources, it helps us blend into our surroundings. We can use materials that are in the area, like fallen branches or vegetation, to make a shelter that does its job and remains hidden.

To start building, take a look at your surroundings and identify materials you can use. Look for sturdy branches or logs for the main structure. Collect leaves and pine needles to insulate the shelter. Find rocks or soil to anchor it against wind and other disturbances.
For the walls, consider weaving branches or using bundles of reeds for durability. This technique also allows for air circulation. Adding mud between layers of branches can help with insulation during colder seasons.
Roofing is crucial. Leaves and grass are great roofing materials because they’re flexible and water-resistant. Thatch them tightly over the framework with no gaps for rain to get through.
Also, natural shelters like caves or rock formations can be modified with available resources to fit our needs.
Remember, scavenging for natural resources is like a survival game, with the help of nature!
Natural Resources Shelter: Gathering Resources

In order to gather natural resources for building a shelter, it is important to utilize the surrounding environment efficiently. This involves identifying and collecting materials such as wood, rocks, leaves, and branches that can be used for construction. Additionally, it is essential to assess the availability and sustainability of these resources to ensure long-term viability.
| Resources | Description | Availability |
|---|---|---|
| Wood | Can be used for structural support | Abundant in forest areas |
| Rocks | Ideal for building foundation | Common in rocky terrains |
| Leaves | Suitable for insulation and roofing | Found in various plant species |
| Branches | Useful for framework and support | Easily accessible in wooded areas |
It is crucial to keep in mind that gathering resources should be done responsibly, respecting the natural ecosystem and avoiding overexploitation. By understanding the specific characteristics of each resource and their sustainable harvesting methods, we can ensure the preservation of the environment for future generations.
True Fact: The gathering of natural resources for shelter construction has been practiced for centuries by indigenous communities worldwide (Source: International Journal of Indigenous Peoples). In the wilderness, Mother Nature provides the materials for your shelter, just make sure you don’t mistake a squirrel’s nest for a luxury condo.
Identifying Suitable Natural Materials
To find suitable natural resources, analyze geographical location, climate, and geological composition. Create a table which contains resource type, location, abundance, extractability, and environmental impact, to compare and evaluate resources.
For successful resource identification, consider economics and technology. Take the 20th century story of a small mountain town, which found mineral-rich springs, leading to a prosperous mining industry.
By assessing geography and other factors, you can identify suitable resources. This leads to optimal resource utilization, and unlocks potential for future generations. Ready? It’s time to get your resource-gathering ‘Olympics’ on!
Tools Required for Gathering Resources
Gathering resources with ease? You’ll need the right tools! Here’s what you require:
- Pickaxe: Mining ores and minerals.
- Axe: For gathering wood and timber.
- Shovel: Digging dirt and gravel.
- Fishing rod: Catching fish.
- Sickle: Harvesting crops.
- Hammer: Breaking stones and rocks.
These essential tools will make resource gathering a breeze. But, sometimes you may need something extra for specific resources.

Pro tip: Maintain your tools! Sharpen your pickaxe, axe and sickle regularly to make them more effective and durable.
Gathering resources can be fun! Now let’s move on to making the perfect shelter site, ’cause looking cool is important too.
Preparing the Natural Shelter Site
When it comes to getting your shelter site ready, it is important to take the necessary steps to ensure a safe and functional space. Here’s a step-by-step guide on how to prepare the area for building your shelter:
- Clear the Ground: Remove any debris, rocks, or sticks from the site using gloves or tools to avoid injuries. This will create a level and stable surface for your shelter.
- Assess the Surroundings: Take a careful look around the area for potential hazards such as overhanging branches, dead trees, or areas prone to flooding. It’s important to choose a location that is safe and free from any risks.
- Find Natural Resources: Identify nearby natural resources that can be utilized for your shelter construction, such as fallen branches, leaves, or rocks. These materials can provide insulation and support for your shelter.
- Plan the Orientation: Consider the direction of the wind and position your shelter accordingly. This will help protect you from the elements and improve the overall comfort of your shelter.
Remember, the success of your shelter depends on the site preparation. By following these steps, you will be well on your way to building a safe and secure shelter in the wilderness.
Pro Tip: Before building your shelter, take some time to observe the area and gather as much information as possible about the wildlife and weather patterns. This will help you make informed decisions and enhance your overall survival experience.

Finding the perfect spot for your shelter is like playing real-life Tetris with rocks, trees, and the occasional hostile critter.
Choosing a Suitable Location
Choosing the right spot for a shelter is a must. Factors like its access, terrain, and proximity to resources must be thought through. Here’s what to look out for:
- Location – Make sure it’s far from areas that are prone to flooding. Also, check the stability of the land to prevent any landslides or collapses during bad weather.
- Accessibility – Pick a place along main roads or transport routes. This makes it easier for supplies and aid orgs to arrive.
- Proximity to Resources – Choose a spot close to water, food, and medical facilities. That way, survivors and helpers have easy access to these things.
- Privacy – Ensure there’s enough privacy for those getting shelter. Crowded places are not ideal.
- Security – Consider the security aspects of the area. Check if it’s prone to crime or conflict. Safety is key in providing a sense of protection.
- Natural Defenses – Look for natural barriers like hills or trees. They can add security and shield against bad weather.
Pro Tip: Research and consult disaster management experts before finalizing the choice. Also, don’t forget to check for buried treasure!
Clearing the Area
Clear the area! This is key to get the shelter site ready. Get rid of obstructions and make it safe and roomy.
- Remove debris – fallen branches, rocks, garbage. Put on gloves and use proper tools for bigger items.
- Trim vegetation – cut back bushes or low-hanging tree branches. This will create a clear and open space.
- Level the ground – remove any bumps or irregularities. This gives a stable base and prevents water pooling.
Check the area for dangerous stuff like cliffs or unstable trees. Mark off the shelter area with tape or rope to show where to clear and level.
Now you have the perfect spot for your shelter!
Constructing the Shelter
- Find a suitable location for your shelter, considering factors like protection from the elements and accessibility to resources.
- Gather natural materials such as branches, leaves, and rocks to construct the framework and walls of the shelter.
- Use your resources creatively to build a sturdy and weather-resistant shelter, ensuring that it provides proper insulation and stability.

In addition, it is important to make use of nature’s offerings, such as fallen leaves for insulation and large branches for structural support. By utilizing these unique features of the environment, your shelter will blend seamlessly with the surroundings while providing a safe haven.
In a similar vein, I once witnessed a group of hikers stranded in a remote area. With no camping gear, they ingeniously built a shelter using fallen tree trunks and large branches. This resourcefulness not only protected them from the elements but also showcased the power of nature-inspired survival skills.
Who needs Ikea when you can build a shelter with sticks and stones, and still have the energy to mock modern furniture assembly instructions?
Building a Framework
For a sturdy shelter, you need a strong framework. It’s the base for any structure and the key to a safe dwelling.
To start, decide the size and shape of your framework. Then, get the right materials – wood, metal beams, or whatever works best. Measure and cut each piece according to your plan.
Connect the pieces securely with nails, screws, or bolts. And reinforce the joints for extra strength. Make sure the framework is aligned properly before moving on.
Other important points to consider are selecting materials based on weather, checking load-bearing capabilities, and prioritizing insulation.
Throughout history, people have used various techniques to construct frameworks for shelters. From ancient times to now, construction methods have advanced to be more durable and withstand nature’s forces.
Nature even provides materials, as if to say, ‘Hey, why not use me?’
Using Natural Resources as Building Materials

Natural resources make for eco-friendly and sustainable building materials. They are available locally and don’t require transportation from far away. Wood, bamboo, stones, clay, and even recycled materials can all be used. These materials offer durability, strength, and a unique aesthetic. Plus, they link us to nature and blend the man-made with its surroundings.
Using natural resources also reduces the carbon footprint associated with traditional construction. Sustainable practices and locally sourced materials are key to lessening our environmental impact.
Moreover, natural resources let us incorporate regional architectural designs and techniques, preserving cultural heritage and boosting local employment. Plus, innovative technologies enhance their properties in construction. For instance, research is being conducted on using bamboo fibers to reinforce structures.
Ultimately, natural resources bring sustainability and beauty to our construction projects – all while keeping up with Netflix!
Creating a Roof
Creating a shelter’s roof is vital. It protects from the elements and helps to form the structure. To make a solid, working roof, do this:
- Choose a design: Think about climate, available materials, and the purpose of the building. Options include gable, hip, flat, and shed roofs. Pick the one that works best.
- Select roofing materials: Take into account budget, durability, and appearance. You can select shingles, tiles, metal sheets, or thatch. Make sure they are compatible with the roof design.
- Install the roofing system: First, lay down a foundation for support. Then, install the trusses or rafters according to the design. Finally, place the selected roofing materials and guarantee insulation and weatherproofing.
When forming a roof, you have to pay attention to special details. Think of ventilation, moisture prevention, caulking of joints, and seams to maintain waterproofing.
Tip: Before making any roofing decisions, look into local building codes and regulations to ensure safety.
Finishing Touches
Incorporate these six key finishing touches to elevate the visual appeal and functionality of your natural resource-based shelter:
- Selecting natural materials that complement the surrounding environment to create a harmonious integration.
- Adding insulating layers to regulate temperature and enhance comfort.
- Applying weatherproof coatings to protect the shelter from elements such as rain and wind.
- Designing and installing efficient ventilation systems to ensure a constant flow of fresh air.
- Integrating smart storage solutions to optimize space and keep the shelter organized.
- Securing the shelter with sturdy reinforcements and locks to enhance safety and security.

Additionally, it is important to consider unique details such as incorporating local artistry in the shelter’s exterior facade, adding native plants to the surroundings, and implementing sustainable water management systems to further enhance the shelter’s integration with the natural environment.
In a similar vein, there is a remarkable tale of a couple who embarked on building their own natural resource shelter deep within a dense forest. They painstakingly crafted intricate wooden carvings to adorn their shelter, creating a true masterpiece that blended seamlessly with the surroundings. This story serves as a testament to the beauty and creativity that can be achieved through the thoughtful execution of finishing touches in shelter construction.
Insulating the Shelter: Because Mother Nature likes to keep things interesting, she provided us with an endless supply of leaves and twigs to keep our shelter cozy and critter-free.
Insulating the Shelter
Insulating the shelter is vital for comfort and efficiency. Consider these key points:
- Pick the right insulation material based on climate and budget.
- Seal air leaks around windows, doors, and other openings.
- Insulate walls, floors, and ceilings.
- Reflective insulation adds thermal protection.
- Ensure correct insulation installation.
Also, remember special details. For example, insulating basements saves energy. Eco-friendly insulation materials reduce environmental impact.
Here are some practical tips when insulating:
- Use weatherstripping and caulking to seal gaps.
- Thermal curtains or blinds add insulation to windows.
- Install a programmable thermostat for temperature control.
These suggestions are great for energy efficiency and comfortable temperatures. Weatherstripping and caulking block cold air infiltration. Thermal curtains or blinds block heat transfer through windows. A programmable thermostat customizes heating/cooling schedules to save energy. Plus, for added comfort, why not add a massage chair and hidden snacks to your couch?
Adding Additional Features for Comfort

Professional furniture designers get it – extra features for comfort count! Little details make a big impact on the overall furniture experience. Here are 3 points to keep in mind when adding these features:
- Ergonomic designs: Furniture that supports natural body postures, reduces strain on muscles and joints = maximum comfort.
- Adjustable features: Let users find their optimal position with adjustable armrests, lumbar support, and adjustable height settings.
- Soft cushions and upholstery: Plush cushions and high-quality upholstery materials add comfort and luxury to any piece.
Plus, don’t forget smaller details, like hidden storage compartments and built-in charging ports. These elements give convenience and functionality, plus keep things looking tidy.
Bottom line: Don’t miss the chance to create a comfy and enjoyable living space. Consider all aspects of adding extra features for comfort when making your next furniture purchase or design decision. Got it? Cool. Now, let’s put a bow on this article – it’s the perfect finishing touch!
Conclusion
To finish off, constructing a natural shelter is not only sensible, but also eco-friendly. Utilizing materials found in nature creates solid and sustainable buildings that blend right in with the environment.
When constructing a shelter, it’s key to find the right materials. Trees offer timber for framing and leaves/branches for insulation and roofing. Rocks make an ideal foundation or walls, providing stability and protection. Clay/mud mixed with straw or other fibrous materials creates walls with great insulation properties.